Follow Me On Social Media!

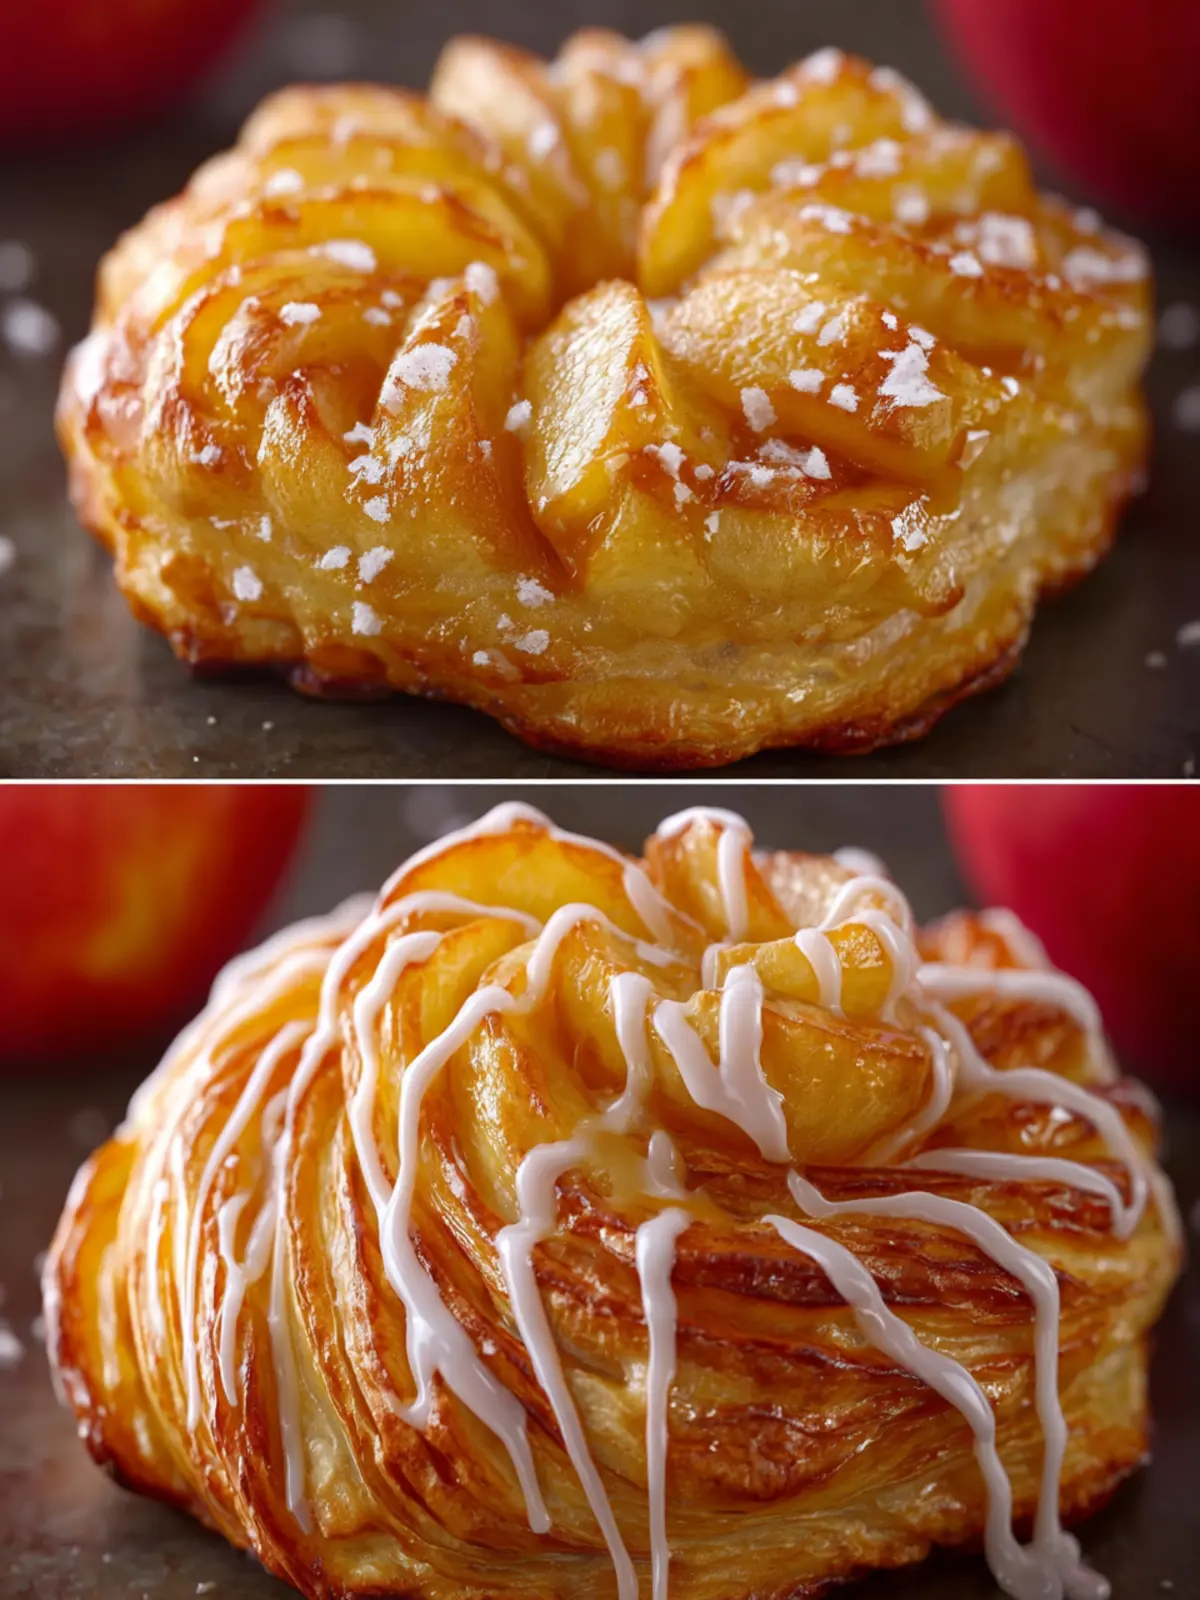
Apple Danish Bliss: Irresistibly Flaky and Delightfully Sweet
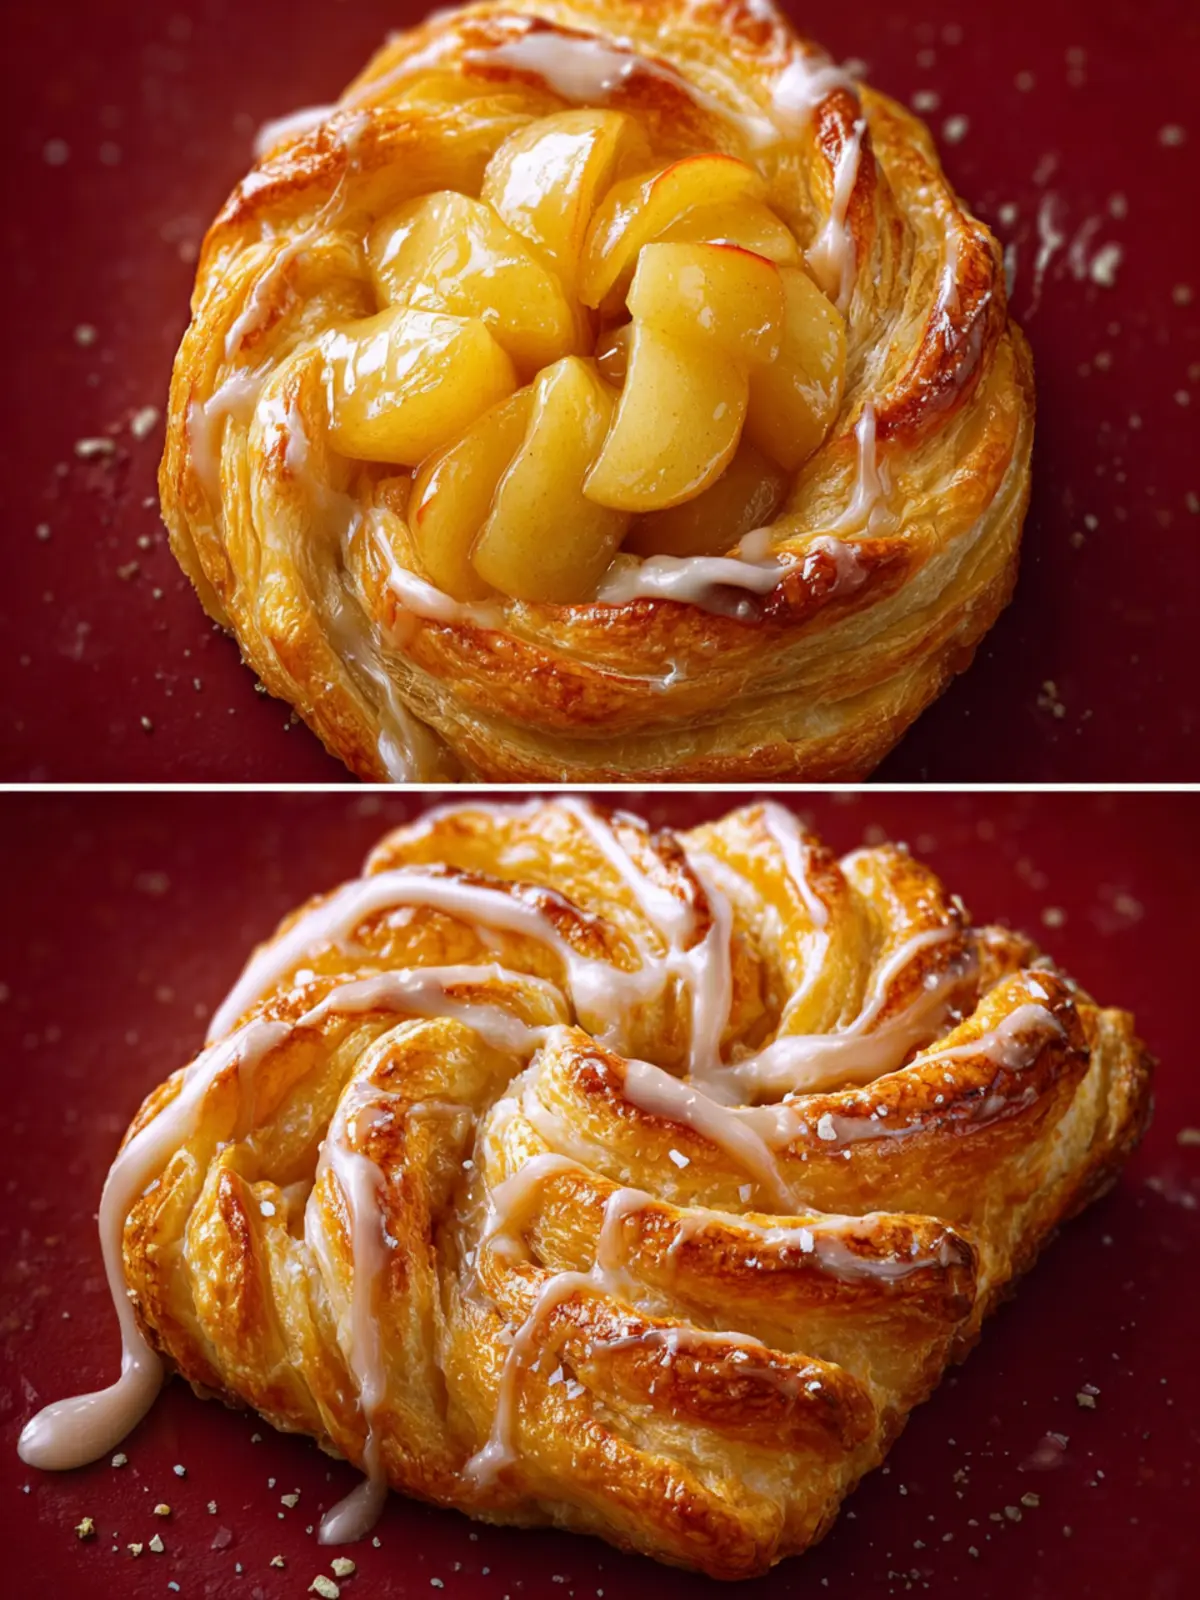
Introduction to Apple Danish
There’s something irresistibly delightful about an Apple Danish—that perfect balance of flaky pastry and sweet, spiced apple filling. My journey into the world of Apple Danish began in my grandmother’s kitchen, where the warm aroma of cinnamon and baked apples created a cozy backdrop for countless family memories. As I stood by her side, she would explain how the delicate layers of pastry were achieved, often sharing tales of her own childhood in a bustling bakery. Those stories, paired with the sheer joy of eating a freshly baked Apple Danish, ignited a passion in me that I still carry today.
Fast forward to adulthood, and my love for this treat deepened further. Each time I bit into a warm Apple Danish, it transported me back to simpler times, sparking feelings of nostalgia. I found myself experimenting in my own kitchen, attempting to replicate that perfect pastry we made together. While it took practice and a few burned attempts, the moment I succeeded in crafting my own flaky creations from scratch was undeniably satisfying.
If you’re contemplating making your own Apple Danish, you’ll be thrilled to discover how simple it can be. With just a handful of ingredients, you can create a treat that’s perfect for breakfast, brunch, or even an afternoon snack. Just imagine serving these golden pastries to friends and family, the tantalizing smell wafting through your home, inspiring envious glances as they ask just how you made them.
As we dive into the upcoming recipe, keep in mind the key ingredients that create this classic delight. Prepare to experience the magic that lies within an Apple Danish, turning your kitchen into your very own bakery. Let’s roll up our sleeves and get started on this culinary adventure!
What’s the story behind my love for Apple Danish?
My love for Apple Danish is not just about the taste; it’s about connection, tradition, and memories. Every time I indulge in this delightful treat, I’m reminded of those cherished moments in the kitchen, the bond between generations, and the warmth of family. What stories will you create while making your own?

Key Ingredients for Apple Danish
Apple Danish is a delightful pastry that offers a warm, comforting embrace in every bite. To bring this iconic dish to life, using the right ingredients is key. Let’s dive into the essentials that make this treat so special.
-
Apples: Choosing the right apples is crucial. I prefer using Granny Smith apples for their perfect balance of sweetness and tartness. They hold their shape during baking and provide a lovely contrast to the rich pastry.
-
Puff Pastry: For the Apple Danish, I rely on store-bought puff pastry for convenience and flaky perfection. Just thaw and roll it out, and you’re ready to create layers of buttery goodness.
-
Butter: Butter enriches both the pastry and the filling. I use unsalted butter, which allows me to control the saltiness in the dish. It adds a luxurious flavor and glossy finish to our pastries.
-
Sugar: Granulated sugar sweetens the filling, while a dusting of powdered sugar on top adds an elegant touch. For a twist, consider a sprinkle of cinnamon sugar before baking.
-
Cinnamon: This spice is what ties the flavors together, adding warmth and nostalgia. A pinch goes a long way, enhancing the natural sweetness of the apples.
-
Eggs: An egg wash brushed on the pastry before baking creates a beautiful golden crust. Plus, incorporating egg into the filling adds richness.
With these ingredients, your Apple Danish will not only taste incredible but also fill your kitchen with an irresistible aroma. Happy baking!
Why You’ll Love This Apple Danish
Imagine waking up to the heavenly aroma of fresh Apple Danish baking in your oven—there’s just something about that warm, flaky pastry that makes breakfast feel like a celebration. This delightful pastry perfectly balances sweetness and tartness, thanks to the juicy apples nestled in a buttery layer of puff pastry.
The best part? Making this Apple Danish is simpler than you might think. With just a handful of ingredients and a dash of love, you can create a masterpiece worthy of any brunch table. Picture yourself lifting a slice of this golden goodness, beautifully layered, with a gooey apple filling and a dusting of powdered sugar that sparkles like morning dew.
You’ll appreciate how versatile this recipe is too; whether you’re serving it up at a weekend brunch with friends or enjoying a quiet moment with your morning coffee, it always fits the occasion. Plus, the crispiness of the pastry combined with the tender warmed apples offers a delightful texture that’s hard to resist.
As you take that first bite, you’ll discover why this recipe is a beloved favorite—it’s comforting, satisfying, and downright delicious! Treat yourself to this Apple Danish, and let each bite inspire joy and contentment.
Tips for Making Perfect Apple Danish
Creating the ideal apple Danish is like crafting a warm hug in pastry form. From choosing the right apples to perfecting flaky layers, I want to share my top tips to help you elevate your baking game.
Choose the Right Apples
- Opt for tart apples such as Granny Smith or Honeycrisp. Their natural acidity balances the sweetness of the filling and prevents the Danish from becoming overly sugary.
Master the Dough
- Using ready-made puff pastry can save you time, but if you’re up for it, making your own dough is worth the effort! Ensure your butter is cold, which helps achieve that coveted flaky texture.
Don’t Skip the Egg Wash
- An egg wash not only gives your apple Danish a beautiful golden finish, but it also helps the pastry seal beautifully while baking. Just beat an egg with a splash of milk for the perfect wash.
Fill with Care
- When adding the apple filling, don’t overstuff. Leaving space around the edges allows the pastry to rise and prevents spillage, keeping your Danish neat and appealing.
Bake at the Right Temperature
- Preheat your oven thoroughly and bake your apple Danish at a high temperature, around 400°F (200°C). This quick blast of heat helps the pastry puff up beautifully and become golden brown, creating that delightful flaky texture.
By incorporating these tips, you’ll create an irresistible apple Danish that’s perfect for enjoying with your morning coffee or as a sweet afternoon treat. Happy baking!
Time Details for Apple Danish
Creating an Apple Danish can feel like a delightful journey into the world of pastry, where the sweet aroma of baked apples fills your kitchen. Here’s a breakdown of the time you’ll need to create this delicious treat.
Preparation time
Set aside about 20 minutes to prepare your ingredients and roll out the dough. Remember, patience is key when handling pastry!
Baking time
Once assembled, your Apple Danish will need about 25-30 minutes in the oven. Keep an eye on that golden-brown color—it’s a good indicator they’re ready to come out!
Total time
From start to finish, you’re looking at roughly 50-60 minutes for your Apple Danish to go from raw ingredients to a beautifully baked pastry on your table. Enjoy every step of this culinary adventure!

Nutritional Information for Apple Danish
When indulging in a freshly baked apple danish, you may wonder what nutritional benefits it can offer alongside its delightful taste. Exploring the numbers can help you make informed choices while enjoying this delicious pastry.
Calories
An average serving of apple danish contains about 320 calories. This balance of sweetness, flaky pastry, and tender apple filling can fit nicely into a balanced diet—especially when enjoyed in moderation.
Protein
You can expect approximately 4 grams of protein per serving. While it may not be a protein powerhouse, the apple danish provides a comforting energy boost, perfect for an afternoon pick-me-up or a thoughtful dessert after dinner.
Sodium
With around 150 milligrams of sodium per serving, the apple danish can complement your meals without being overly salty. It’s a treat that maintains its delicious flavors while staying within reasonable sodium limits for your daily intake.
FAQs about Apple Danish
Diving into the world of Apple Danish is like experiencing a delicious story infused with warm spices, flaky pastry, and sweet apple filling. As you explore this delightful treat, it’s common to have questions about the best methods and alternatives. Let’s address some frequently asked questions to enhance your baking experience.
Can I use store-bought apple pie filling?
Absolutely! Using store-bought apple pie filling can save time without sacrificing flavor. Many brands offer great quality, so look for options that use real apples and natural ingredients. Just be sure to adjust the sugar in your recipe if your filling is already sweetened since this can impact the overall taste.
What’s the best way to store leftover Danishes?
To keep your Apple Danish fresh, store any leftovers in an airtight container at room temperature for up to two days. If you want to preserve them longer, wrap them tightly in plastic wrap and refrigerate, where they’ll last for about a week. For an even longer shelf life, consider freezing them; just make sure to thaw them at room temperature before reheating in the oven for that fresh-baked flavor!
Can I make these Danishes ahead of time?
Yes, you can prepare certain components ahead of time! You can make the pastry dough and filling a day in advance. Just store the dough in the fridge and the filling in an airtight container. When you’re ready to bake, assemble the Apple Danishes and pop them in the oven for a fresh treat that’s bursting with flavor.
Conclusion on Apple Danish
Creating an apple danish is not just about the ingredients; it’s about the joy that fills the kitchen as you knead dough and slice fresh apples. This delightful pastry pairs perfectly with a morning coffee or serves as a charming dessert for guests. Remember, the secret lies in using quality ingredients—fresh apples and real butter—to elevate the flavors.
Next time you crave something sweet, consider making this apple danish. It’s an experience that marries comfort and sophistication, leaving everyone at your table smiling. Embrace the creativity in baking! Each bite is a tribute to your effort and passion.
Print
Apple Cream Cheese Danishes
- Total Time: 45 minutes
- Yield: 8 Danishes 1x
- Diet: Vegetarian
Description
A delicious treat made with crescent rolls and filled with apple pie filling and cream cheese.
Ingredients
Scale
- 2 tubes crescent rolls or rounds
- 20 ounces apple pie filling
- 2 Tablespoons butter, melted
- 1/4 cup granulated sugar
- 1 Tablespoon cinnamon
- 1/2 cup powdered sugar
- 1 teaspoon vanilla
- 2–3 teaspoons milk
- 5 Granny Smith Apples, cored, peeled and diced
- 1 1/4 cups water
- 3/4 cup granulated white sugar
- 1/4 cup cornstarch
- 1 teaspoon cinnamon
- 1 Tablespoon fresh lemon juice
- 8 ounces cream cheese, softened
- 1/3 cup white granulated sugar
- 1 egg yolk, room temperature
- 1 teaspoon fresh lemon juice
- 1 teaspoon vanilla extract
- 1 egg, beaten
- 2 Tablespoons water
- 1/2 cup powdered sugar
- 1/2 teaspoon vanilla extract
- 1 Tablespoon milk
- 1 17 ounce box of Puff Pastry, thawed
Instructions
- Preheat the oven to 425 degrees.
- Line a baking sheet with parchment paper.
- If making apple pie filling from scratch, add 1 1/4 cups water, 1/4 cup cornstarch, 3/4 cup granulated white sugar, 1 teaspoon cinnamon, and 1 tablespoon fresh lemon juice and bring to a boil over medium heat while whisking constantly.
- Once the mixture begins to boil, stir and cook until thickened.
- Add the diced apples to the mixture and stir to combine. Turn temperature to low and simmer covered until apples are tender (approximately 8-10 minutes).
- In a medium mixing bowl, beat 8 ounces cream cheese until smooth.
- Add 1/3 cup granulated sugar, 1 egg yolk, 1 teaspoon vanilla extract, and 1 teaspoon fresh lemon juice; mix for 2 minutes or until smooth.
- Gently unroll the puff pastry and divide it into thirds along the seams and then into thirds again widthwise to create 6 squares.
- Place the squares on a baking sheet.
- Fold a square in half from corner to corner to create a triangle, with the open part facing up.
- Using a knife, slice 1/2 inch down from the top along both sides, without cutting through the bottom.
- Open the sliced dough and fold the corners over, creating a pocket.
- Fill each pocket with 1-2 tablespoons of the cream cheese mixture and top with 1-2 tablespoons of the pie filling.
- Brush with egg wash (beaten egg mixed with 2 tablespoons water).
- Bake for 12-14 minutes or until golden brown.
- Mix 1/2 cup powdered sugar, 1 tablespoon milk, and 1/2 teaspoon vanilla extract to make the glaze.
- Drizzle over Danishes after they have cooled slightly. Enjoy!
Notes
- Each tube of crescent rolls makes approximately 4 Danishes.
- Use kitchen shears to cut the apples into small pieces for easier filling.
- These Danishes can be served warm or at room temperature.
- Prep Time: 25 minutes
- Cook Time: 20 minutes
- Category: Dessert
- Method: Baking
- Cuisine: American
Nutrition
- Serving Size: 1 Danish
- Calories: 250
- Sugar: 15g
- Sodium: 150mg
- Fat: 15g
- Saturated Fat: 8g
- Unsaturated Fat: 5g
- Trans Fat: 0g
- Carbohydrates: 30g
- Fiber: 1g
- Protein: 3g
- Cholesterol: 30mg